The Orchid Development Report
- This page displays some of the development reports, for full reports please visit miro board: https://miro.com/app/board/uXjVOOVuSz0=/?share_link_id=599794429690
2.1 Dataset Selection
2.1.1 Dataset Selection
Link: Source of the Orchid Flowers Dataset (Apriyanti, Spreeuwers, Lucas and Veldhuis, 2020)
2.1.2 Body Dataset
(Left) Mannequin material recommended by animation students (Prokopenko, 2018)
(Middle) A set of artistic portraits, also with mannequin material (Theo, 2022)
2.2 Dataset Pre-processing
Since the training of GANs has strict requirements on the size and color channels of the dataset, I need to pre-process the images before training。ImageMagick is a free and open-source cross-platform software (LLC, 2016) suite for displaying, creating, converting, modifying, and editing raster images. Therefore, the -mogrify command in this open-source software is a way for us to pre-process the dataset more efficiently.
2.2.1 Software Installation
Link: Source of the ImageMagick Open Source Plugin (LLC, 2022)
In order to install the plugin ImageMagick using the API, I need to enter the following code in the terminal.
# Calling API
/bin/bash -c "$(curl -fsSL
https://raw.githubusercontent.com/Homebrew/install/HEAD/install.sh)"
# Install Image Magick
brew install imagemagick
brew install ghostscript
2.2.2 Orchid Pre-Processing
a.Resize
In most cases, the images must be square-shaped and they must all have the same power-of-two dimensions.(eg.256x256/512x512/1024x1024)(Karras et al., 2020) So we need to make sure that each photo has the same dimensions as above, for this we need to call ImageMagick in the terminal and enter the following command
# Copy the files to backup
cp -r /Users/xinyunhuang/Desktop/dataset /Users/xinyunhuang/Desktop/dataset_square
# Trim file to 1024x1024 size
cd /Users/xinyunhuang/Desktop/dataset_square
magick mogrify -resize 1024x1024 *.jpg(Invalid)
mogrify -resize 1024x1024! *

Image: Image was trimmed to a square of the same size 1024x1024
b.Channel processing
As observed from the first training results(See 3. GANs Training & Testing - Test1-2), we get generated images with background noise, which means that both Generator and Discriminator use the elements of the background as a factor for generation and discrimination. To reduce the disturbance caused by this noise, I decided to remove the background layer from the dataset. To do this I searched for the API from remove-bg, which means we can perform the de-contextualization operation quickly and efficiently.


Link: Source of the remove-bg API
Image: Image with background removed
2.2.3 Body Pre-Processing
a. Resize
Again, the dataset needs to be resized
# Trim file to 1080x1920 size
mogrify -resize 1080x1920! *
b.Channel processing
And unlike the orchid, body dataset is used as a base image, it needs a non-alpha channel background, for this reason, after removing the background of the original image, I need a piece of code to fill its transparent background with white.
#Add a background with the color white for transparent png images
magick mogrify -format png -background white -alpha background -alpha off *.png
(Left) The original unprocessed image
(Right) The image is removed-background and filled with a white background
However, because the photographs in the Window-lit series were used for artistic sketching, the body structure of the models is relatively invisible. In addition, the dynamic amplitude of this set of photos is too variable and the sample size is limited.
In the second test (See 3. GANs Training & Testing - Test3)conducted with this dataset, it can be seen that the trained graph has some vague abstract aesthetics. However, the shape of the body is blurred, which is fatal in conveying meaning. This means that the audience cannot get the information the author wants to express visually quickly (See WIP1 Feedback). After further consideration, I decided to change the data set
After comparison, the Yoni dataset provided by Proko - Stan Prokopenko was chosen, which was used for animated modeling and therefore had a flatter dynamic range of models and a larger sample size.
(Left) 'Window-lit' series from Theo, which has a strong formal aesthetic and contrast between light and shadow, but this makes the trained images past abstraction and does not give good feedback
(Right) 'Yoni' series from Stan Prokopenko, a series with a rich dynamic model and a high number of samples for training
2.2.4 Hybrid (Orchid-Body Overlay)
Tip: In this section, the pics of Body is named mother.jpg/png, which means it is under the layer overlay; the pics of Orchid is named son.jpg/png, which means it is above the layer overlay.
However, I have close to thousands of datasets, and it would be a huge amount of work to arrange them one by one in another dataset! For this reason, I have thought of three different solutions.
1. put every Body and Orchid in Photoshop synthesis and then generate (almost impossible, because there are nearly 1000 photos in total)
2. use Python to batch composite the body and orchid (I'm not sure this is possible because I'm worried it will place the orchid outside the penis's position)
3. maybe two separate videos can be generated, and the pose can be detected in ml5, so that the orchid generated video can follow the position of the penis (however, this looks like two completely separate videos, and not a hybrid body)
After talking to Veera at CTL, she thought that using the -pillow code in python would be more implementable and efficient, so I started trying to write some kind of image overlay code.
Image: CTL's Veera's advice
a. Plan A - ImageMagick
It is a good idea to continue along with ImageMagick's plugin, just execute the following code.
#resizes son.png to 256x256 then offsets its position 30 pixels horizontally to the right (+) and 5 pixels vertically down (+). This offset is considered to be relative to its current position (affected by -gravity, above).
magick convert mother.png son.png -gravity Center -geometry 256x256+30+5 -composite -resize 64x64 output.png
However, this approach is not suitable for batch processing of images. So I had to look for a more efficient way to process them, and I chose to try python for this at the suggestion of CTL Veera.
b. Plan B - PythonPIL
The idea of this code is to load the son-image and the mother-image into the same virtual environment and decide whether to perform an overlay by judging the size of each other. This code can achieve the effect of superimposing the son-image on the mother-image.

Image: Plan B source code, Image overlay via PythonPIL
However, the code ignored the transparent channel of the son-image, so that the png image with transparent background could not be superimposed on the jpg. In order to fix this bug, I had to start writing the code with a new idea.
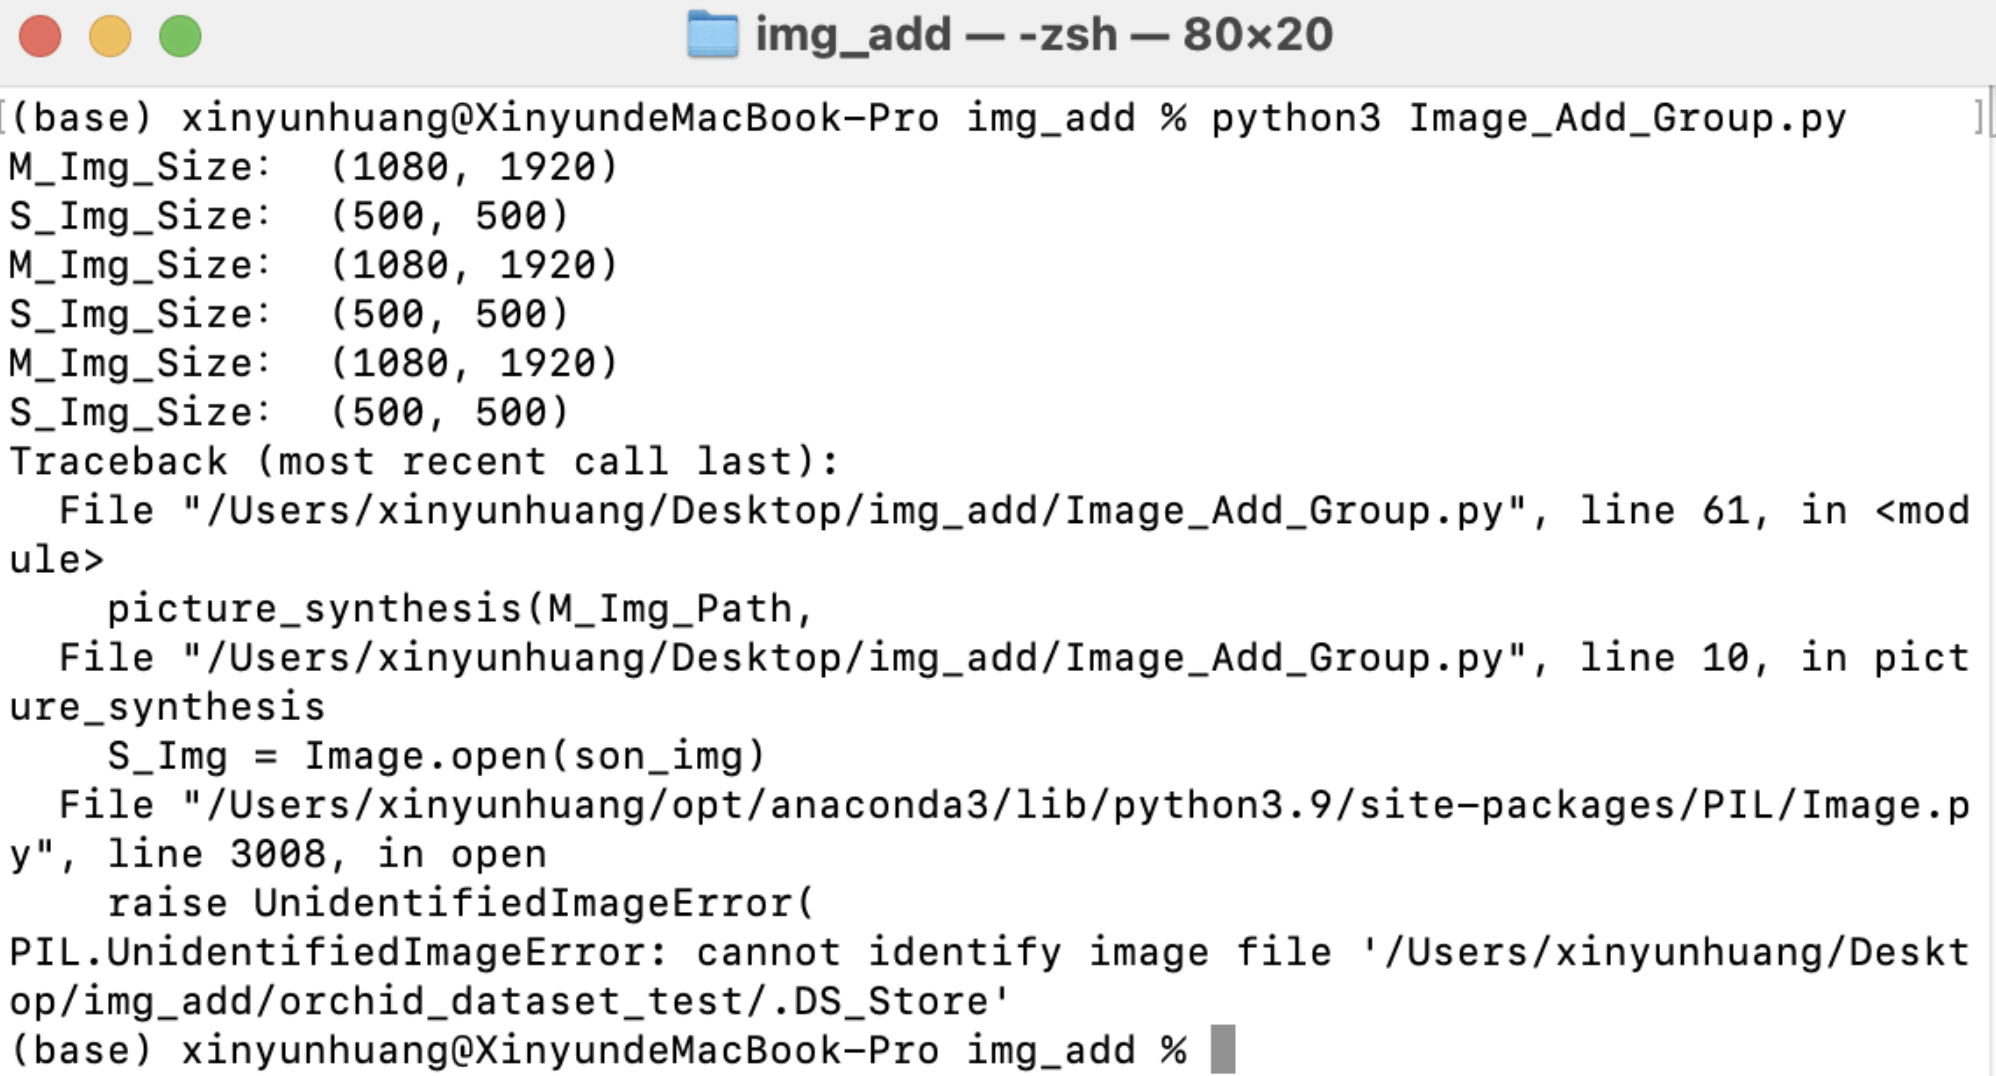
(Left) Image processed after running the code: png cannot be overlaid with transparent layers on jpg
(Right) The display of the terminal after running the code
c. Plan B - PythonPIL(Update)
Unlike the previous code, this code allows the transparent channel of the png image to be loaded by installing the -CV pluginBefore the code can be run, you need to enter the following code first to complete the installation of the extension library
pip install pillow
pip install opencv-python
pip install numpy

Image: Plan B source code update, makeing transparent channels of png images loadable by installing the -cv plugin
The python code written with this in mind is able to superimpose a png with a transparent channel on a jpg, however, during the run, the following error occurs (AttributeError: NoneType' object has no attribute 'shape'). The strange thing is that the error does not affect the code - in fact, the code runs normally and successfully generates an overlaid photo, but the problem is that there are 12 photos in the dataset, so in principle, 12 results should be generated accordingly in the result file (while only one result is generated) What's even stranger is that the code works perfectly fine on a Win computer and generates the corresponding 12 results. After seeking help from CTL and CCI, no reason was found, so the project had to be postponed.
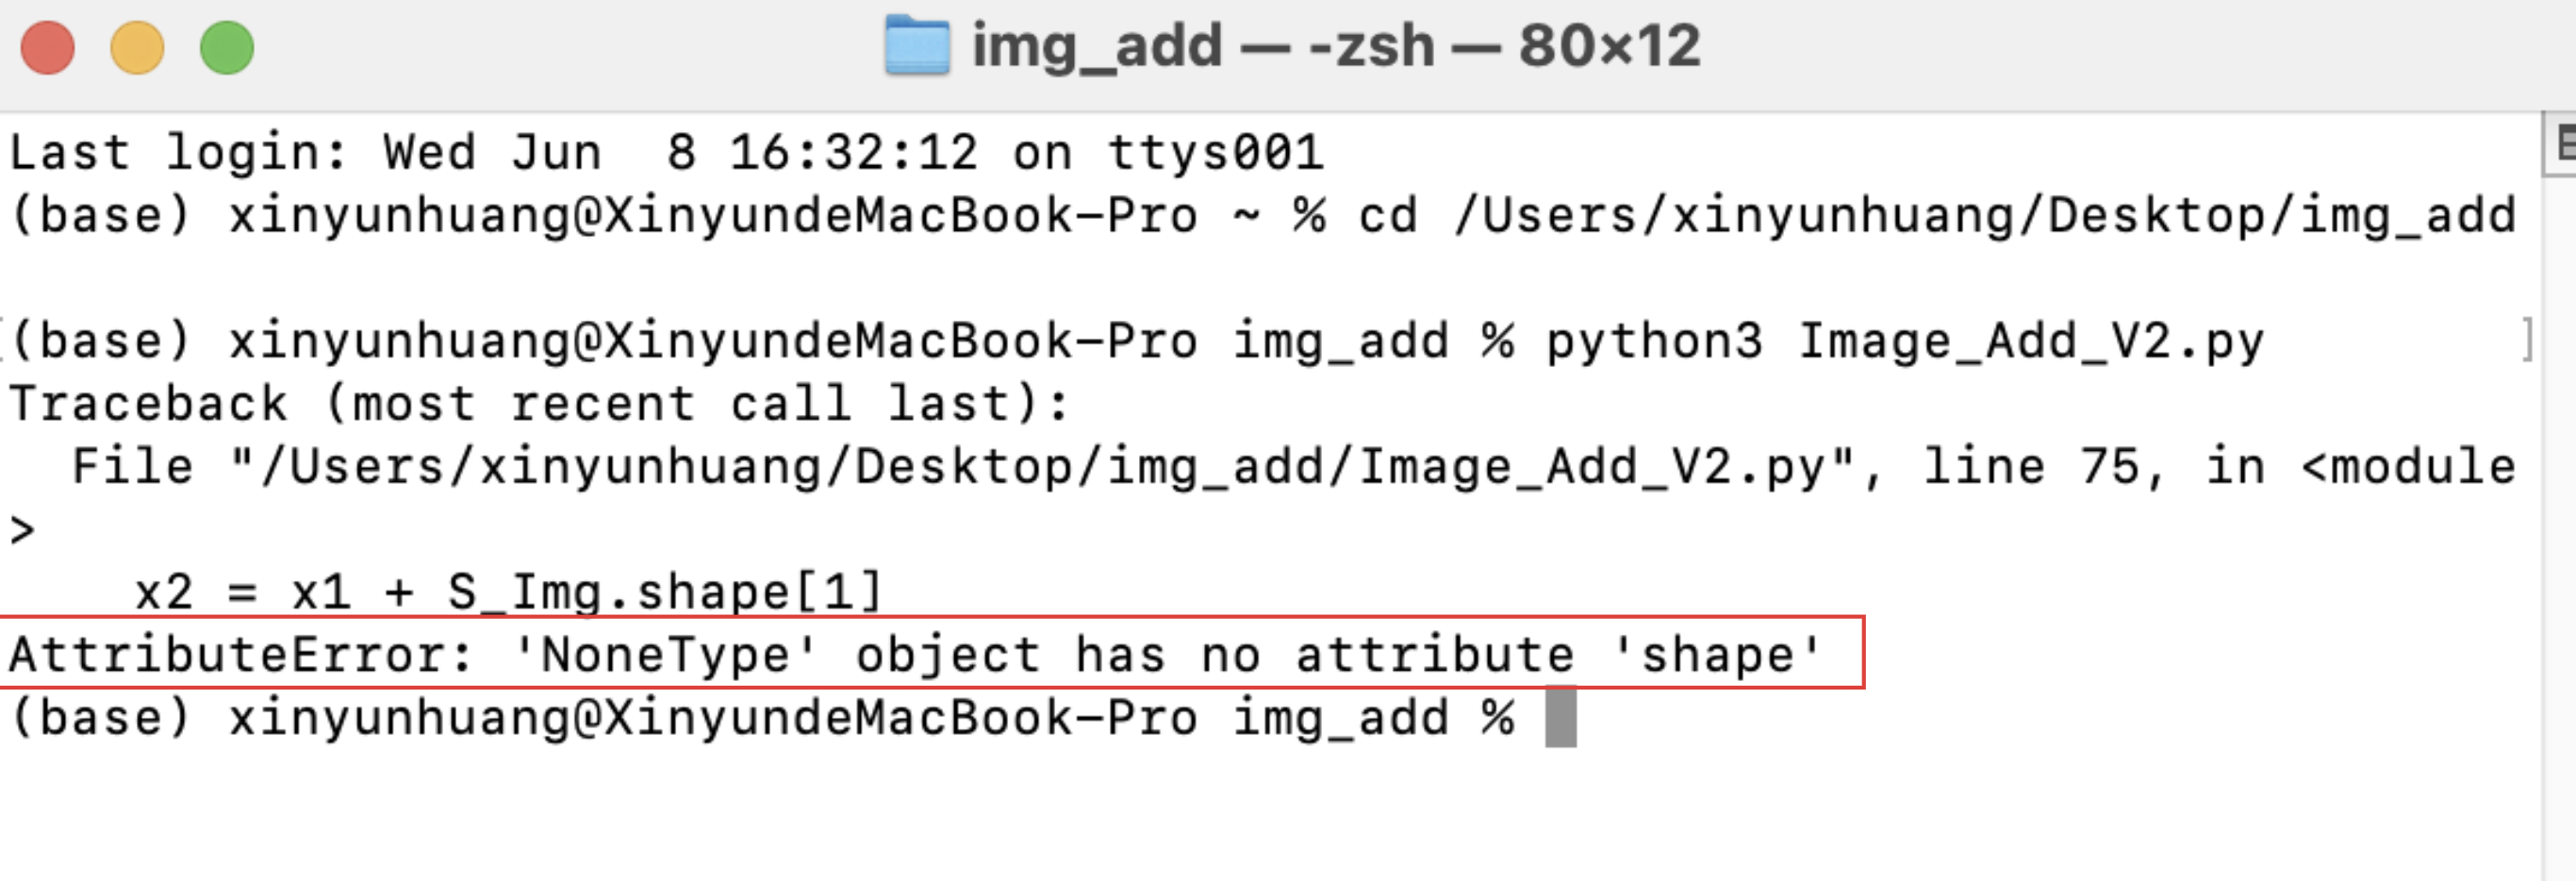
(Left) The son-image is successfully superimposed on the mother-image, and the transparent channel is preserved.
(right) The program shows an error in the terminal, which means that the code has an error in reading the remaining 11 images
d. Plan B - PythonPIL(Debug)
After a week of debug process, I was given the inspiration to -print the list for review. For this purpose I added the following commands to 58/69/70 respectively (in the yellow box in the diagram) to check if the series inside are working properly
print(S_Img_List)
print(S_Img_Path)
print(S_Img)
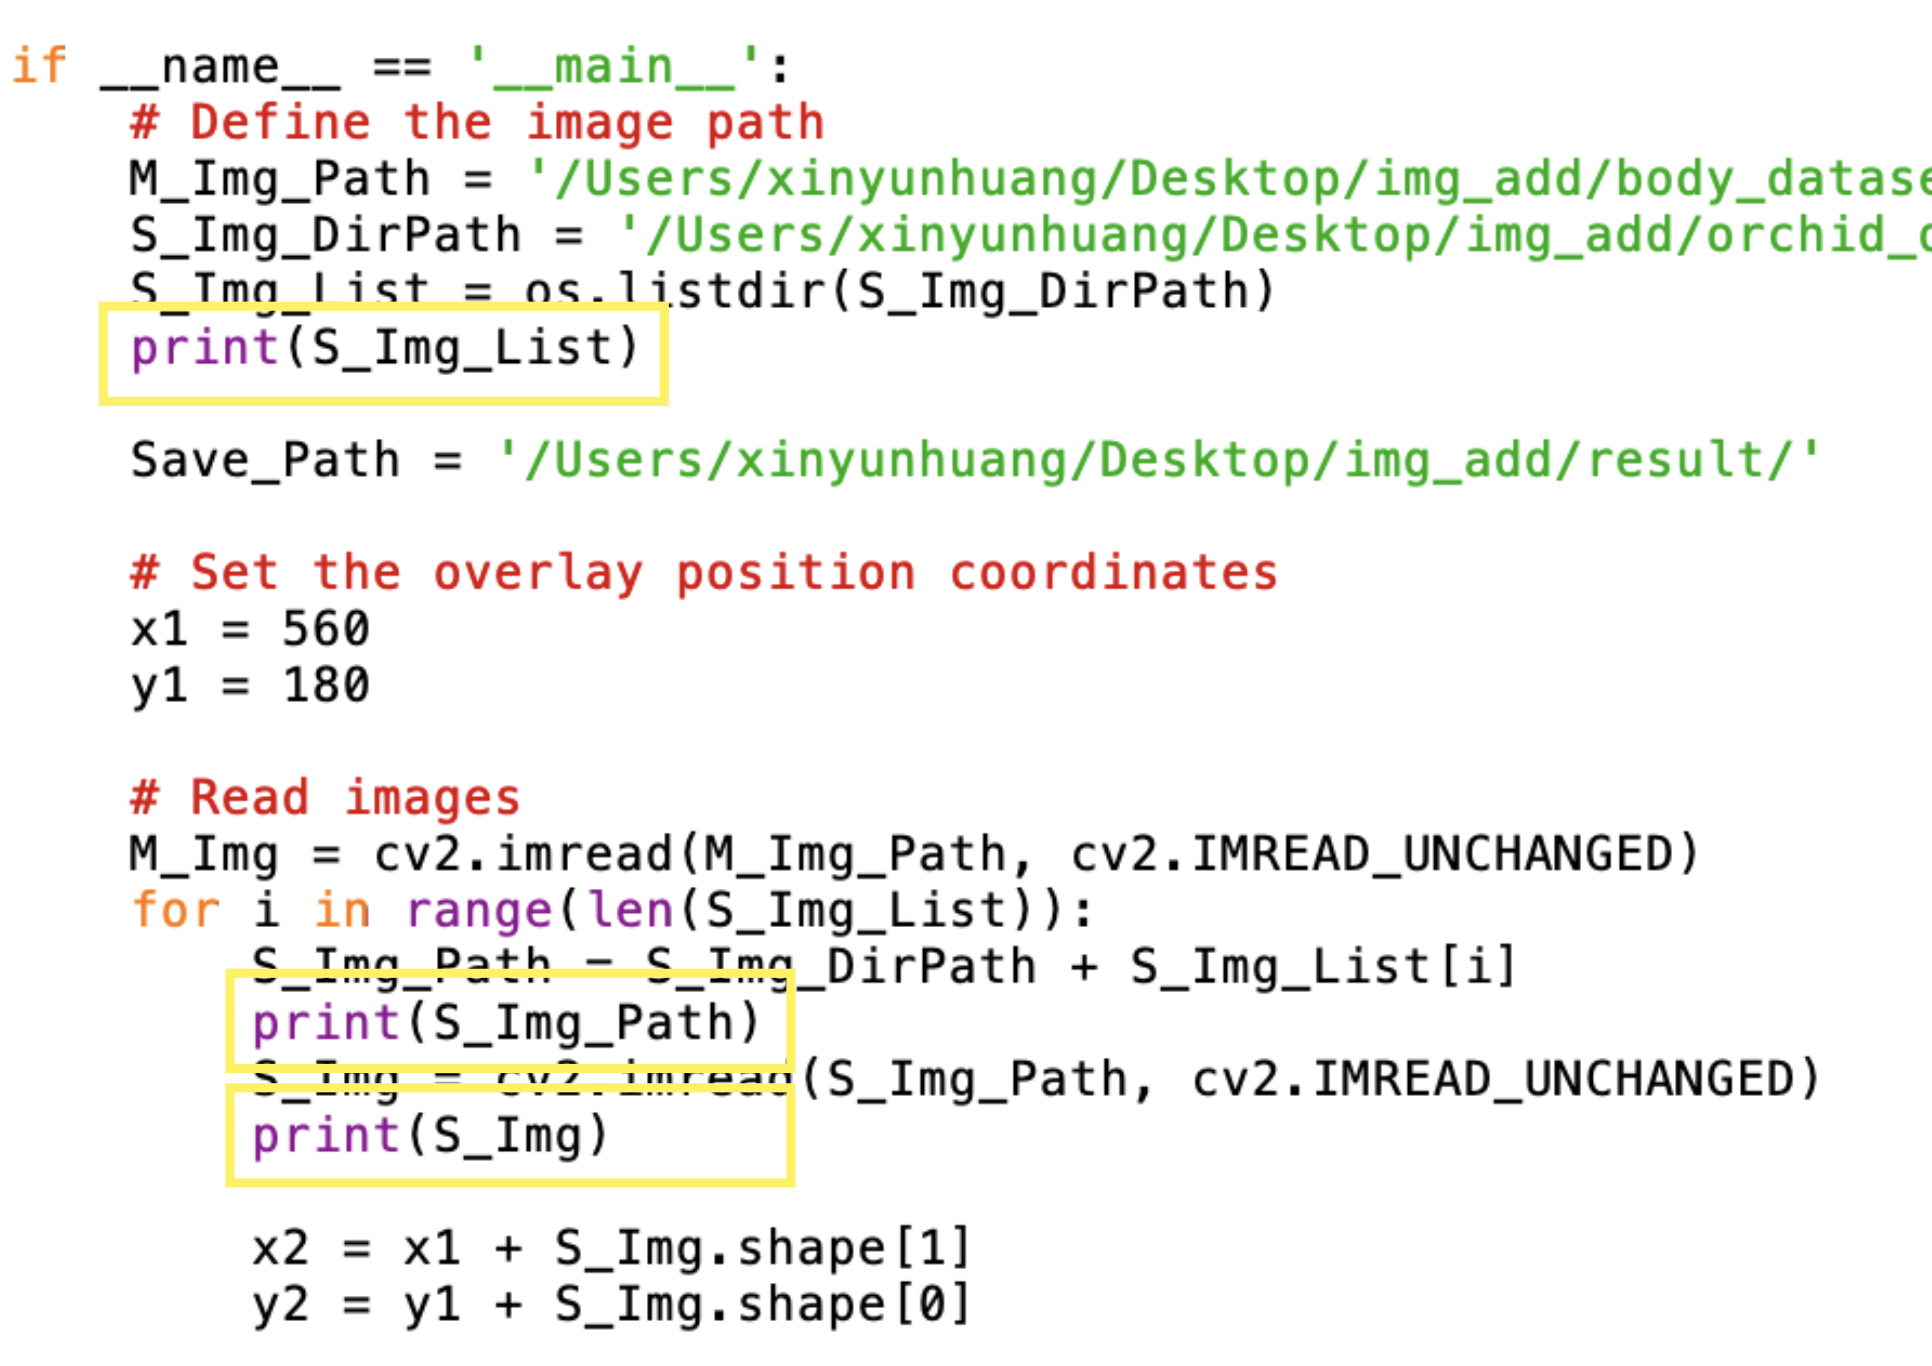
Image:added the -print commands to 58/69/70 respectively to check if the series inside are working properly
The test results are exciting. I found a hidden file that doesn't belong in the file ('.DS_Store' a mysterious folder on mac computers, which doesn't exist on win computers, so they work fine), which means that this hidden file will block the execution of the for loop.


(Top) A hidden folder is displayed in the terminal, which is what prevents the code from running properly
(Button) The hidden folder is not found at all in the directory displayed in the folder
Once I knew what the problem was, I changed the code on line 58 to the following command
S_Img_List = os.listdir(S_Img_DirPath)
S_Img_List = [img_name for img_name in os.listdir(S_Img_DirPath) if
img_name.split('.')[-1] in ['jpg', 'png']]
This will make my code only look for files with png/jpg endings, which means it will skip the '.DS_Store'

Image: The updated code after the correction
e. Plan B - PythonPIL(Processing)
Once the process of debugging the code was over, the next step would be to place the two datasets together in a specific position. Since I needed to place each orchid at the penis of the body, this meant that I had to manually adjust the position of each orchid, which, I have to admit, was a huge amount of work!
We didn't stop trying other more efficient ways. For example, I will train a learning machine that can automatically identify the position of the body penis. The specific implementation idea is: I will collect a large number of body penis images and use them as a dataset to train my learning machine, after training I will get a complete model, and this model allows me to input a vector(In this case, my body dataset) and output the exact location (x, y coordinates) where the penis is located. And this coordinates will be used by me in the python program that overlays the body with the orchid. However, this more efficient way presupposes more machine learning, which means I need more (double) time to complete this solution, however time is really limited and we had to abandon this solution relative to the time cost of the original one, but this will be the next thing I try to do!
Image: Batch processing with PythonPIL
f. Plan B - PythonPIL(Screening)
After completing the complex and time-consuming image merging, I got a total of 43198 hybrid photos (355 (orchid dataset) X 122 (body dataset)). This is a huge number, and in order to make it more efficient to train GANs in the local GPU, I had to pass it through a random selection function to filter out random samples, for which I wrote a python random selection function.

(left) This filtering procedure allows us to obtain smaller samples at random in order to run GANs more efficiently locally(right) The filtering program is automatically selecting samples
2.2.4 Hybrid (Orchid-Penis Overlay)
After feeding the pre-processed Orchid-Body dataset into the GANs for a third test (See 3. GANs Training & Testing - Test6), the feedback received (See WIP1 Feedback) was not as good as expected, most of them thought it was just a photo of orchids placed on the body, without associating it with sex-related symbols. To reinforce this visual association, I had to change the dataset a second time, i.e., replacing the body dataset with a more 'sexual' symbolic penis dataset.
Collecting penis datasets is difficult, and no website is allowed to place such datasets publicly. However, on some sites, such as reddit (or some porn sites), there are many users who post pictures of their penis, which is one way to collect this data, but this not only means a huge amount of time and effort, but also involves personal privacy issues.
Fortunately, a programmer in GitHub shared its styleGAN trained by collecting a dataset of nearly 40,000 penis, and this open source project means I can directly collect the penis generated by this GAN being trained without any privacy issues, because it is fake!
Link: This link provides tens of thousands of photos of dildos, providing me with a complete dataset (TDPDNE, 2020)
After collecting the dataset in this open source project, it is necessary to repeat the above mentioned pre- processing (resized etc) on it and feed it into the GANs. Unlike the above mentioned steps, I abandoned the overlay hybrid approach because it would cause the machine to misjudge the flower as part of the body and thus eliminate the orchid part as noise in the generation process, so that the orchid becomes blurred and abstract in the final rendering. In this hybrid, I try to mix orchid and penis dataset, and mix three times the number of orchid in the penis dataset to 'mislead' machine learning.

Image: A new way of thinking about the dataset: 'misleading' the machine by blending the dataset rather than by overlaying images
Mixing datasets is risky, which means that the sizes and channels of the two sets of images will deviate, and the error reporting during the run validates this idea

Image: Get error when mixed dataset is run on GANs - color channels of both datasets do not match
After the Added 6 imges command, we were prompted with an AssertionError, which means that from the seventh picture onwards (or just the seventh picture) the size or channel is not the same as the other pictures. After checking, it turns out that there are indeed images that are not RGB three channels, but RGBA four channels with alpha channels (even non-transparent images downloaded from the Internet may have alpha channels), and it would be inefficient to check each photo individually, so I sought a code to help us convert all RGBA four channel images to RGB three channels images.

Image: This code help us convert all RGBA four channel images to RGB three channels images
2.3 Conclusion
The selection and pre-processing of datasets is a lot of work, which means I need to learn a lot of code to batch things. Fortunately, however, with the help of CTL, I was able to overcome these difficulties.
As time permits, I will continue to seek datasets with more possibilities, including different forms of body dynamics as well as orchids. In addition, I will also try to use machine learning to handle more complex things, such as automatic localization as mentioned in (e. Plan B - PythonPIL(Processing))
3.1 Build environment
To be able to run GANs locally, you need to build a virtual environment on your computer, which requires the installation of Conda, CUDA, and PyTorch. this is complicated for newbies, but fortunately there are many tutorials on YouTube related to it.
(Left) Link to install Conda: Conda specifically designed for scientific computing so it's great for data science and machine learning tasks it. Lets you easily manage multiple virtual Python environments and simplifies package management. (Conda — Conda documentation, 2017)
(Middle) Link to install CUDA: cuda toolkit is a development environment for creating high performance cheap. You accelerated applications for this you need an Nvidia GPU in your machine and if you have that, then you can go to the website developing the applications and environment for creating high performance cheap. (CUDA Toolkit Archive, 2022)
(right) Link to install PyTorch (PyTorch, 2022)
After installing the above, I need to enter the following command in the terminal to create the installation locally
#Check that conda is installed successfully
conda --version
#Create a virtual environment named env
conda create -n env Python=3.7
#Activating the env virtual environment
conda activate env
#(Check all lists in env)
(conda env list)
#Installing pytorch in env
conda install pytorch torchvision torchaudio -c pytorch
#import torch
import torch
#Enter a random function to check if the torch is working correctly (check that the value in print is the result of the following)
>>> x = torch.rand(3)
>>> print(x)
tensor([0.2703, 0.7653, 0.0780])
#Check if CUDA is running properly (unfortunately, CUDA does not support mac system, so we are not successfully installed)
>>> torch.cuda.is_available()
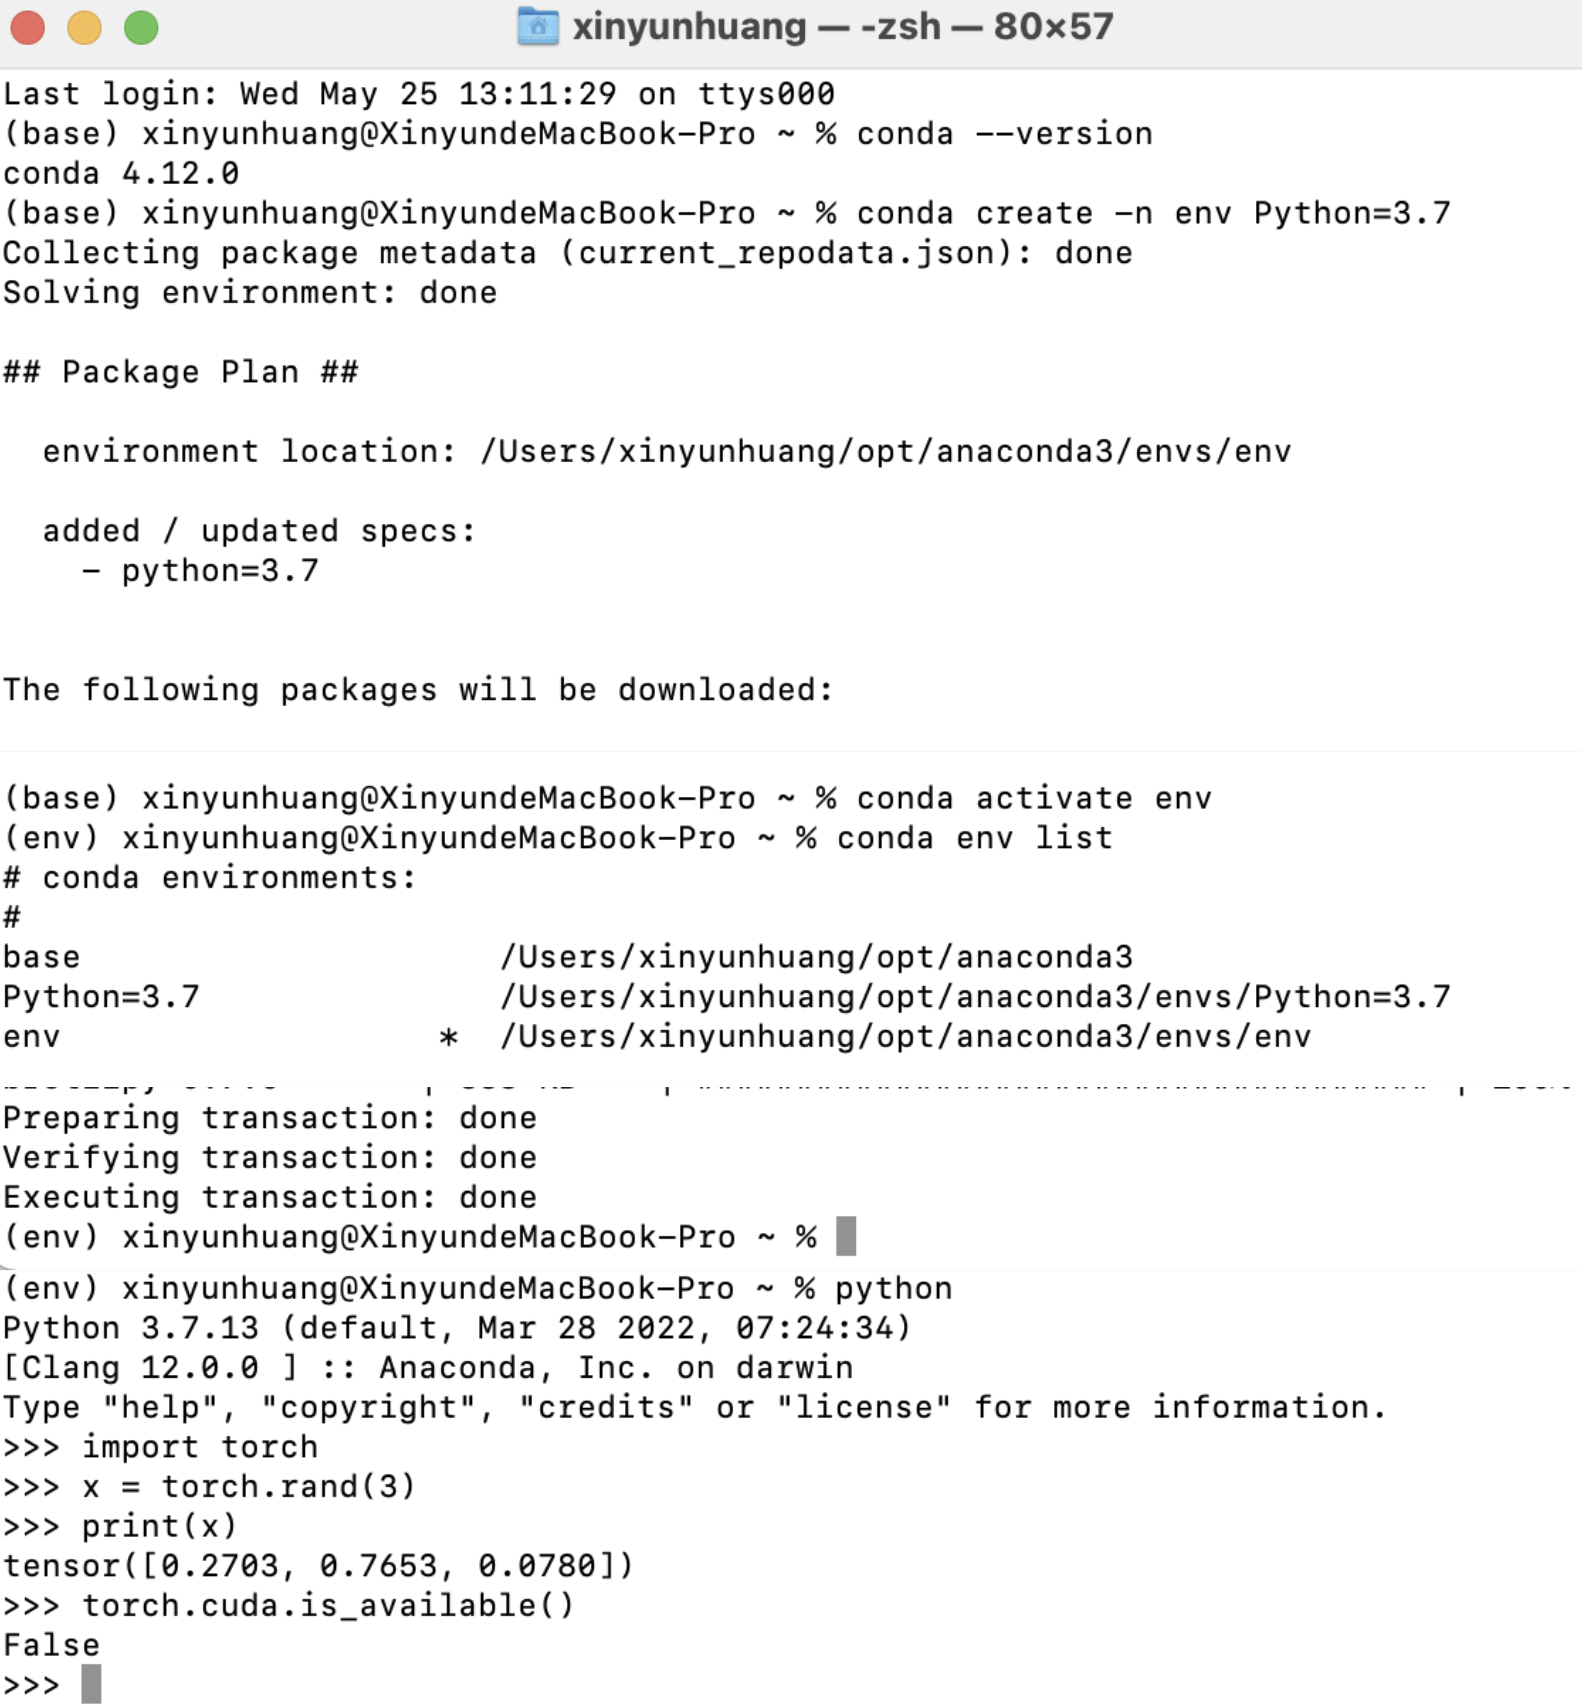
Image: Enter the install command in the terminal

Image: CUDA does not support mac system, so we are not successfully installed
3.2 GANs Selection
3.2.1 Input to DCGAN It is not easy for beginners to find a suitable GANs for their practice. After continuously learning about GANs through self-study and asking Veera, she suggested that I could start with DCGAN, because this GAN is relatively more used and very much research material can be found. In addition to that, a student from University of Toronto School of Continuing Studies trained a series of photos of flowers through DCGAN, which means this will be more relevant to my topic, So I decided to start training with DCGAN.
Link: An open source project shared by students from the University of Toronto, which gave me a lot of inspiration (Tyagi, Alamri and Vasconcelos, 2020)
a. Run in local (Test1)
Before running the dataset on the cloud, run a test run of the code locally to debug the code.
The first time I ran it locally, I got the obvious orchid symbols (including the pink, flower-like characteristics), which means the model is runnable. However, since the dataset image itself has an ambient background, this created a lot of noise during the training process, making the image noisy and making the code more complex and time-consuming to run. Therefore, I had to remove-background the dataset in order to make the model obtain clearer orchid features. In addition, since orchids of different families have different features, this will also lead to interference in the trained results, so I need to select orchid images with the same/similar features based on the labels provided by the dataset (That's what I'm doing in 2. Database Selection & Pre-processing)

Image: The result of the first training. I obtained images with flower features, however, the noisy background made the image blurred
b. Run in local (Test2)
After the background removal process of the dataset, it can be seen that the trained results have clearer contour edges, but at the same time, some of the orchid features are also removed. Therefore, it can be seen that some of the generated images no longer show the features of orchids (pink, flower-like), which is also reflected by the Generator and Discriminator Loss During Training. Since the loss peaked once near 5600, and the data afterwards started to be slightly larger than the loss before 5600, this can be explained to some extent by the fact that the orchid shapes in the dataset differed greatly, causing G and D to be unable to clearly distinguish between orchids and weeds in the same folder. To solve this problem, I need to filter the photos in dataset to get flowers with closer features and eliminate the variegated flowers with strongly different features.

Image: The dataset that was used for the second training has been stripped of the noisy background

Image: The results of the second training. The background is no longer noisy and the edges of the flowers become more defined. However, there are some flowers that have lost their orchid characteristics

Image: The loss peaked once near 5600, and the data afterwards started to be slightly larger than the loss before 5600, this can be explained to some extent by the fact that the orchid shapes in the dataset differed greatly, causing G and D to be unable to clearly distinguish between orchids and weeds in the same folder.
c. Run in local (Test3)
Similarly, I input the images from the body dataset to the model and change the amount of data in the dataset by observing the change in Loss with the generation of Fake img. As more data are input, the iteration of Training increases and the Loss decreases.
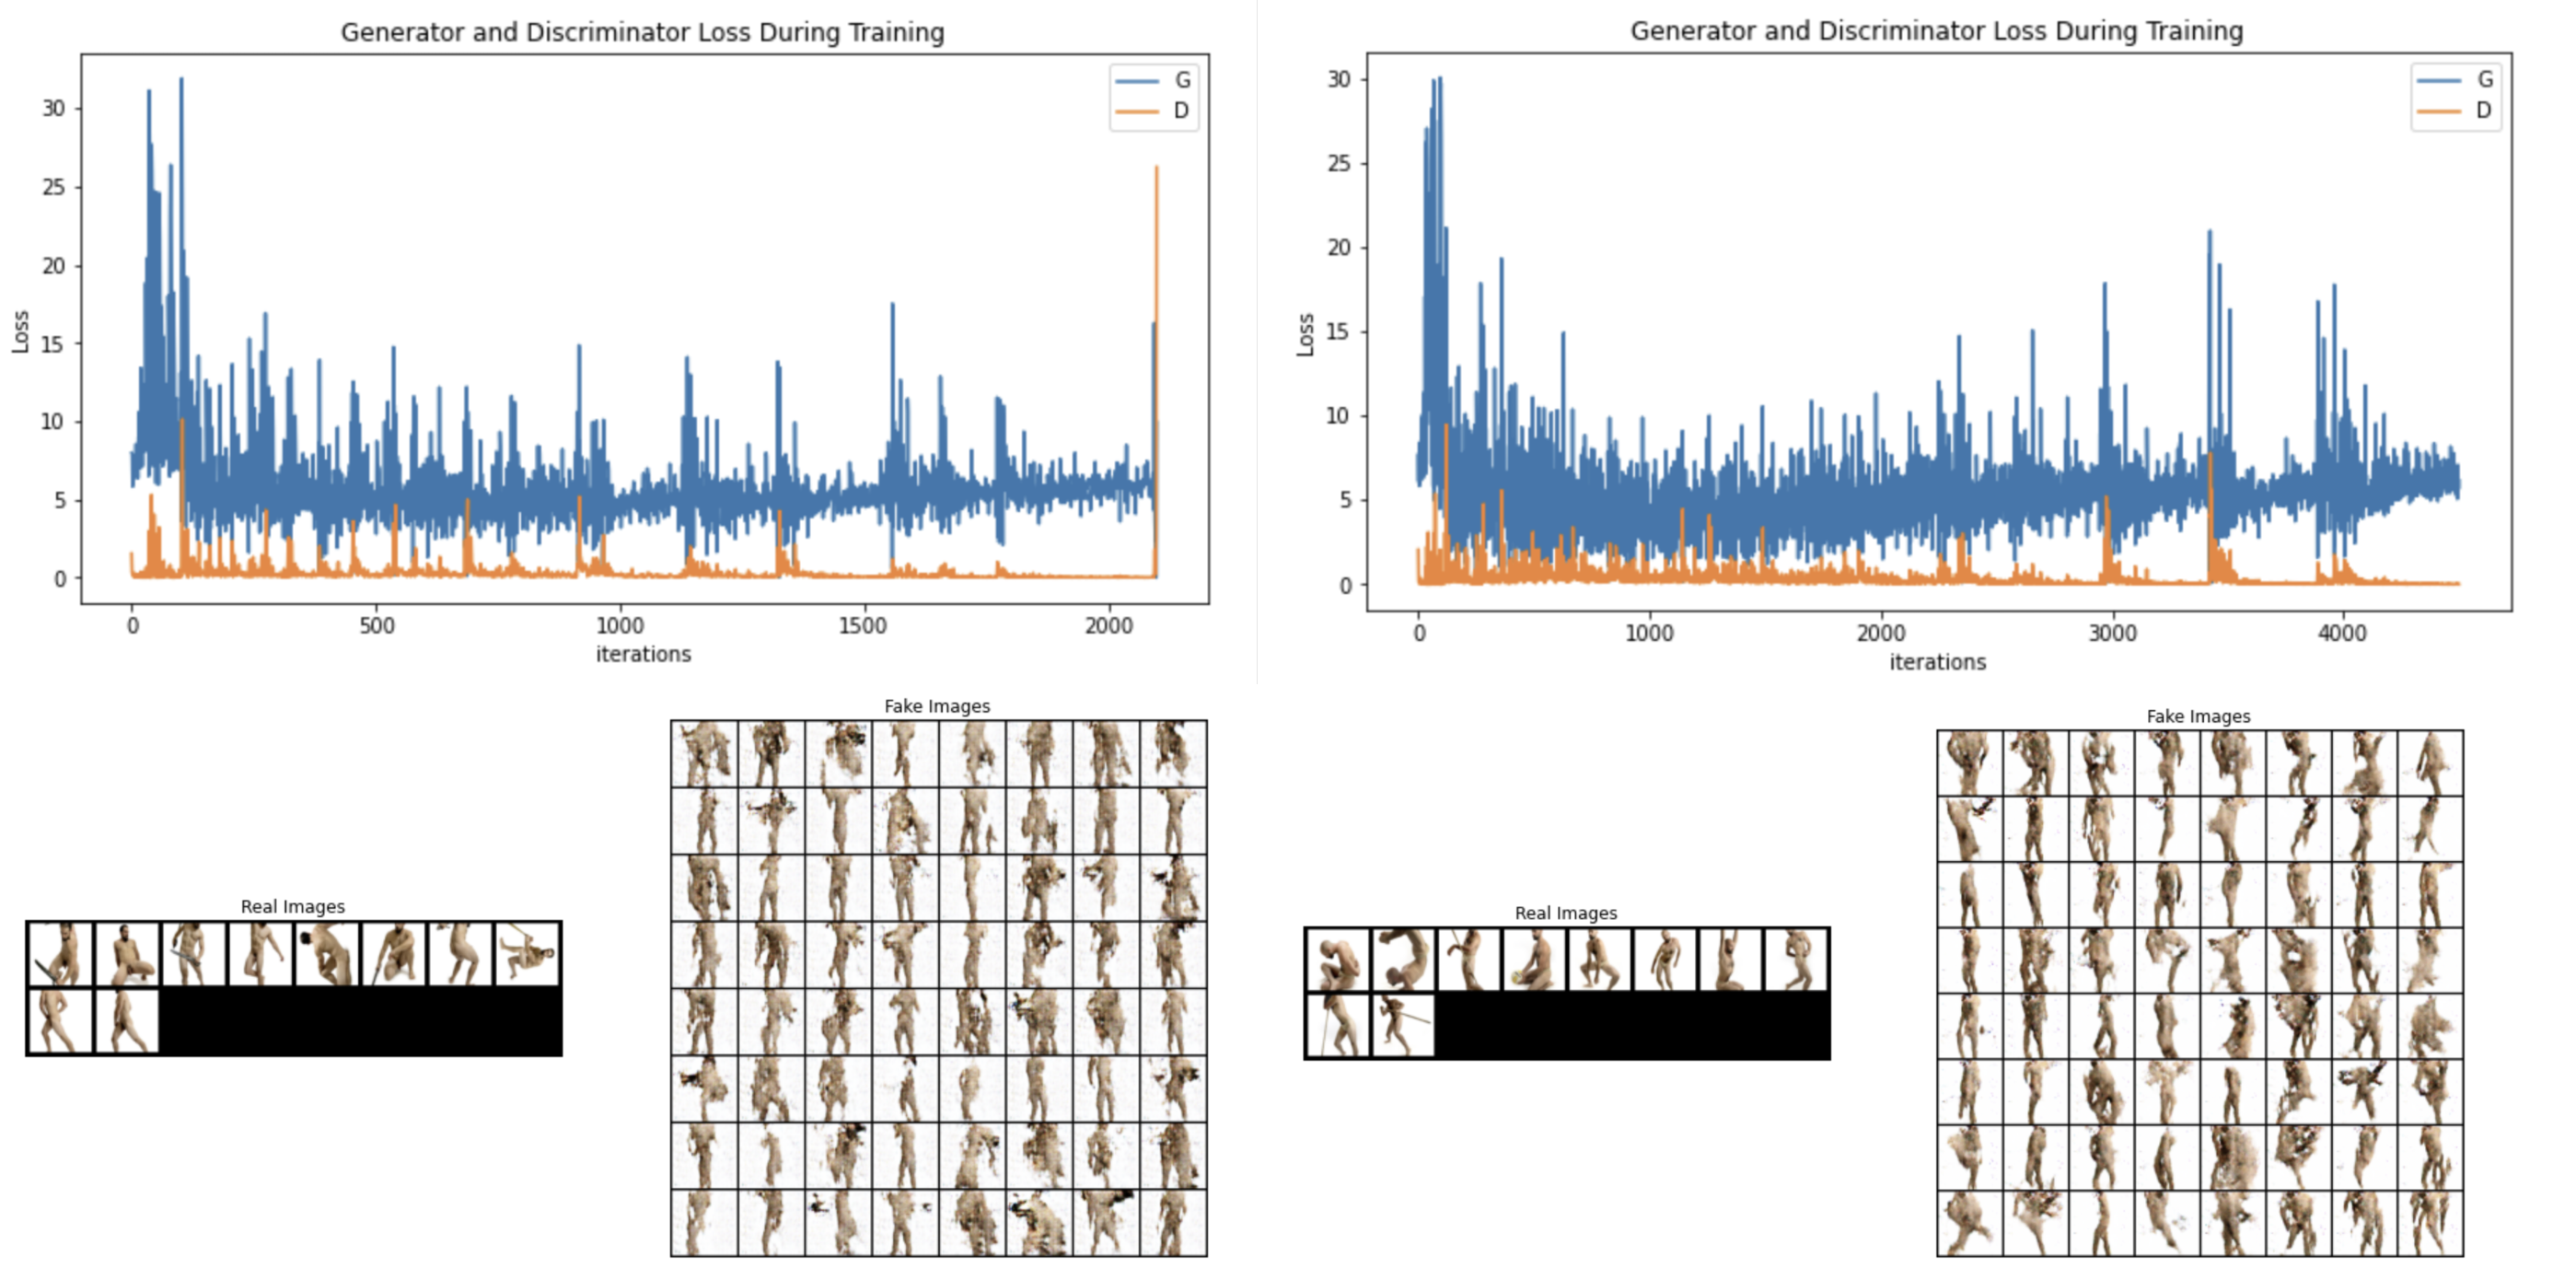
Image: Looking at the Loss values of the two plots reveals the effect of the number of datasets on the generation effect - the more datasets, the higher the quality of the generation
3.2.2 Input to StyleGAN
When reviewing the training results, I found that the generation of DCGAN did not achieve the desired effect, which is partly related to the fact that the pre-training system of DCGAN is not suitable for portraits. After reviewing related literature, I found that styleGAN is often used for false portrait generation, so I started to experiment with different styleGAN.
a. Run in cloud-Google Colab (Test4)
After completing the debug process locally, I decided to try running styleGAN in the cloud. It can be found that in styleGAN, a smaller number of datasets can be used to obtain better results - this is inseparable from the construction of the pre-trained model.

Image:The orchid image generated by styleGAN has more features of orchids than DCGAN

Image:The orchid image generated by styleGAN has more features of orchids than DCGAN
The process of generating images from open source code is complex! I have to admit that much of the knowledge was beyond my knowledge, and with the help of Veera at CTL and the students at CCI, it took us a month to fix all the reported errors, and I have to say, the process was very difficult!
Image: During the debug process we get the error reported. With the help of Veera and CCI students, we fixed them one by one
b. Run in cloud-Runway (Test5)
In addition to running on Google Colab, the open source software Runway is also allowed to run styleGAN, this is a platform that allows novices with no code base to operate more easily. So I also tried to execute styleGAN on Runway.
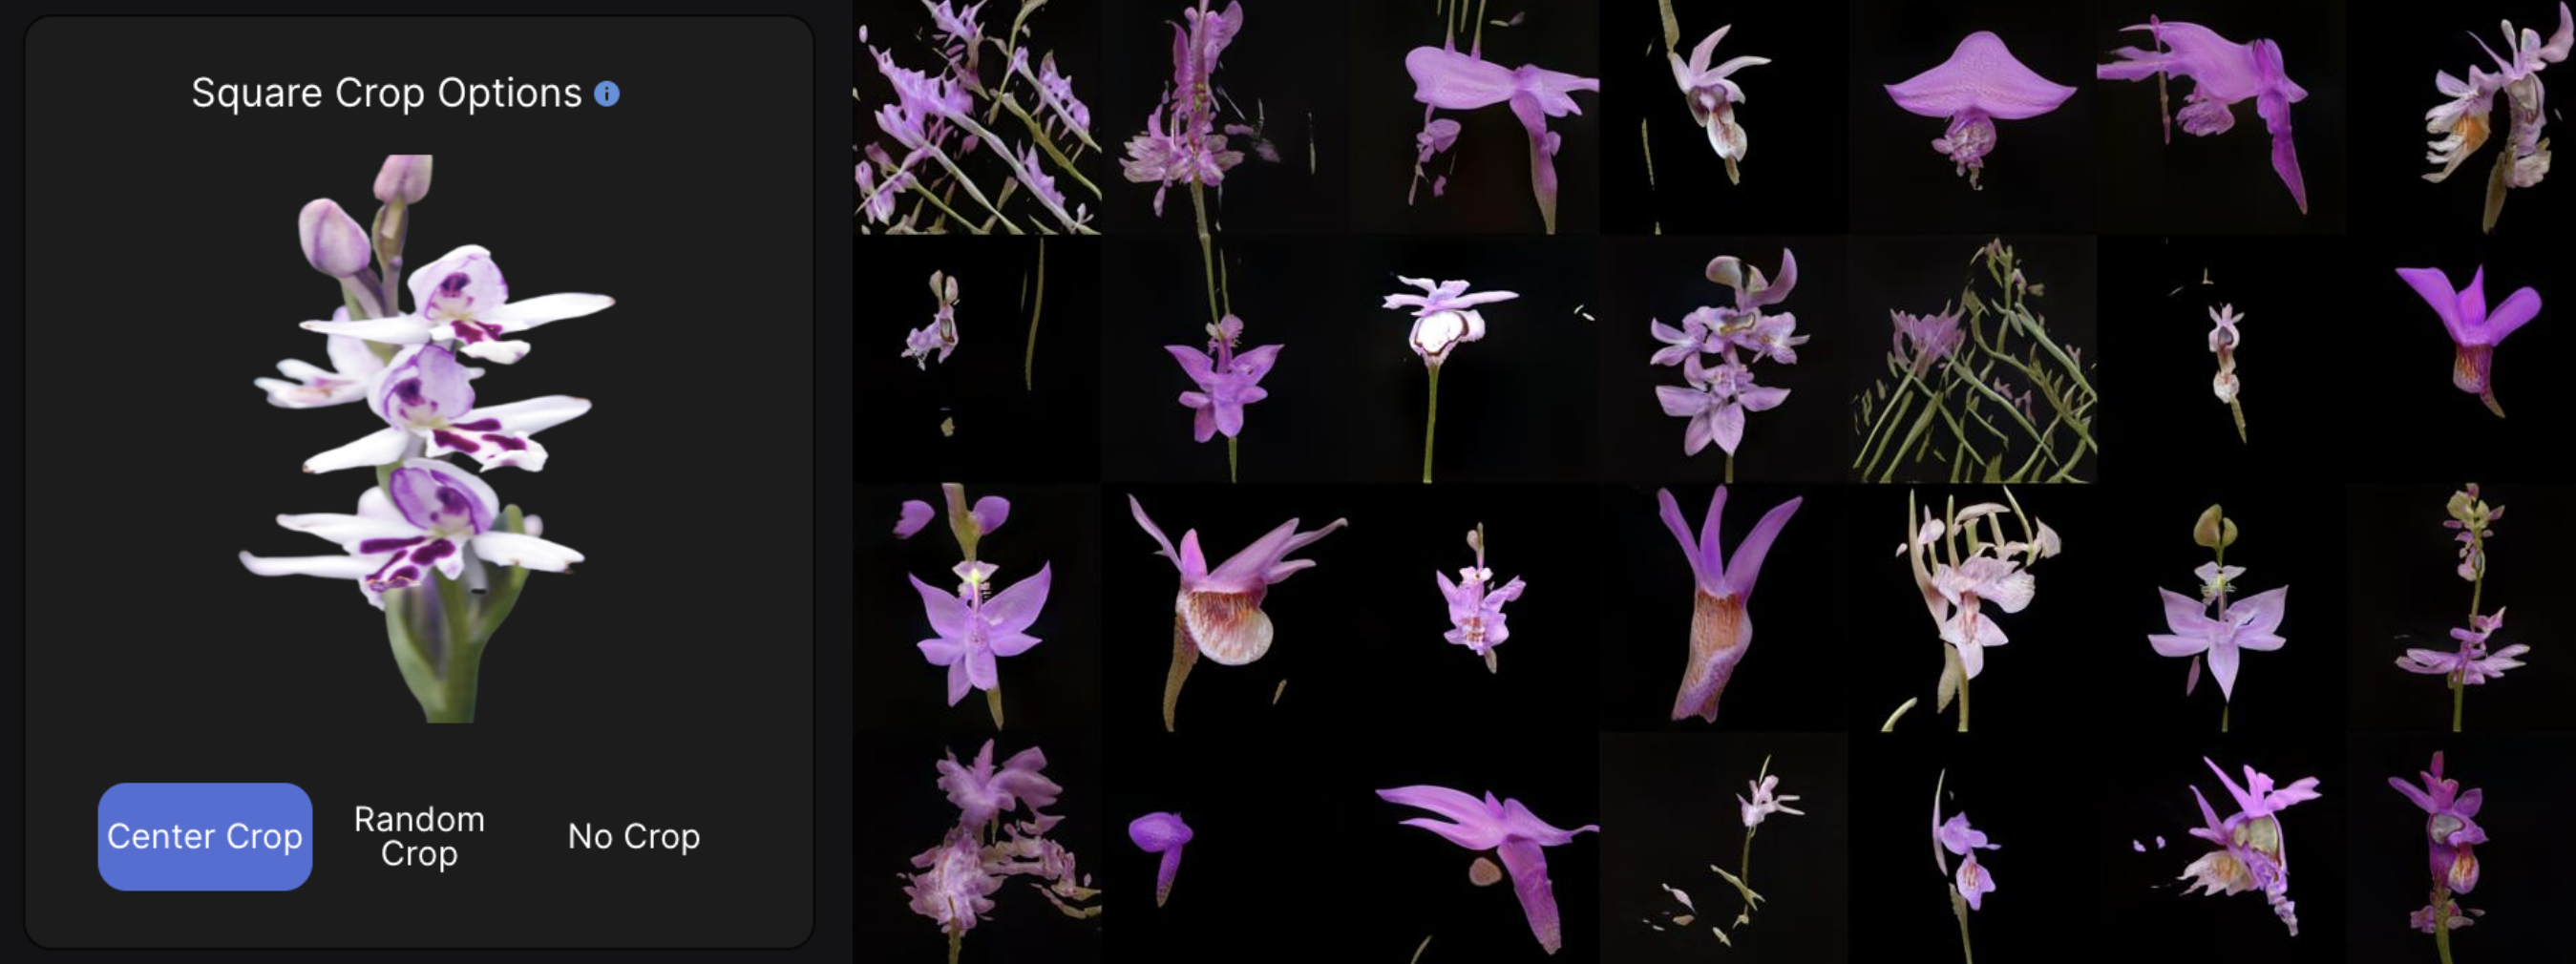
Image:The orchid image generated by styleGAN in Runway, generating higher quality images more efficiently
Again, I tried to input a dataset of human bodies into Runway. a beautiful accident, since I inputted a dataset of only 24 images (far less than the required number), styleGAN generated a series of hazy and elegant photos for me - in fact, it all came from noise.

Image:Images generated from the input human dataset. A beautiful accident generated by styleGAN, the images have a certain hazy beauty, but in reality it all comes from noise
However, this mysterious looking image does not make my viewers feel empathy! Based on the feedback I received(See WIP1 Feedback), I had to make the images more tangible so that the audience could clearly connect the images with the concept of 'sex'.
c. Run in cloud-Runway (Test6 - hybrid body)
In response to the feedback of 'enhancing the viewer's association with sex when they see the image', I tried to place the orchid in the position of the body's penis and trained
Image: Virtual object created by placing an orchid on a human body
However, this placement does not seem to allow the viewer to get a better association, and the viewer thinks that it seems to just place the orchid on the human body, without associating it with a deeper meaning(see WIP2 Feedback)
b. Run in cloud-Runway (Test5)
To make it more intuitive to relate sex to orchids, I refer to the doctrine of signatures in classical botany‘ The testicular shape of orchid tubers suggested to the early Greek rhizotomai that the plants must have sexual properties(Endersby, 2016, p. 43)’
To do this, I replaced the training dataset and mixed the orchid and penis datasets to 'mislead' the machine into determining that the two data are the same vector
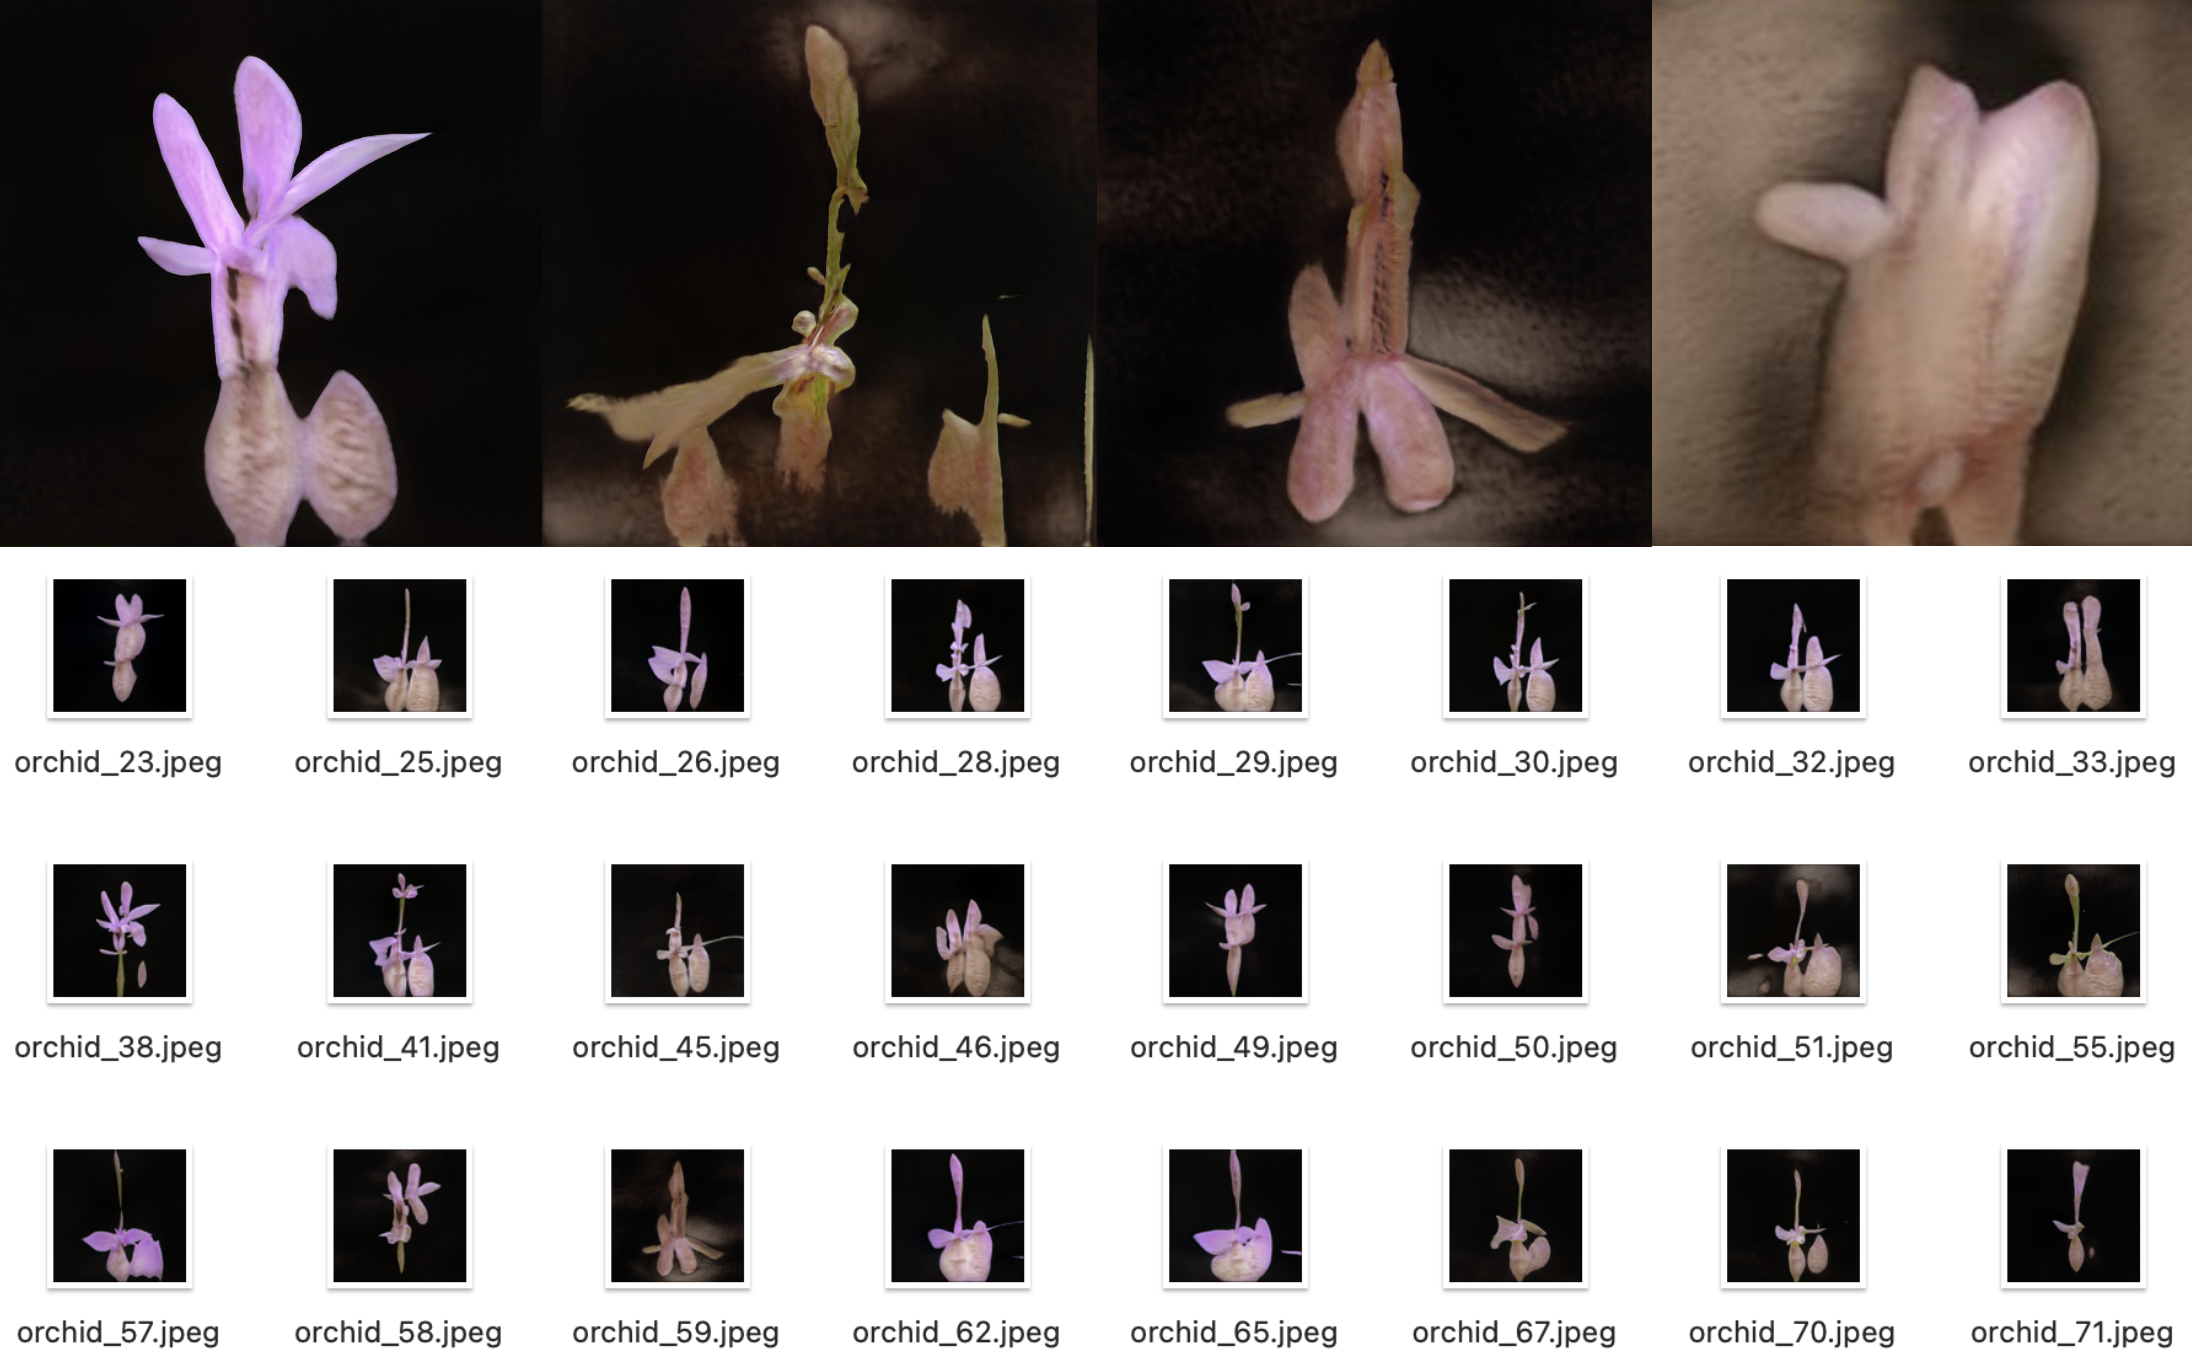
Image:Virtual orchids generated by blending two datasets

Image:Virtual orchids generated by blending two datasets
The experiment turned out to be a good one! In the WIP show, I got good feedback(see WIP3 Feedback), which means that visually I have built some kind of connection, however, it is undeniable that in order to strengthen this connection, I have to rely on more text-like content, such as narrative. Therefore, the training of GANs is now over and the next time should be more focused on narrative.
3.3 Conclusion
Learning GANs is very difficult. But fortunately, with the help of my mentor and classmates, we overcame numerous problems one by one, which definitely helped me tremendously in my practice.
However, the final implementation was not perfect, and while reviewing papers, it seemed to me that cycleGAN might be better suited to the juxtaposition of datasets - it works by learning the 'features' of a dataset and can be implemented to change the the role of features. In my next practice, I will continue to experiment with different types of GANs in pursuit of better representation.